Tuesday, May 03, 2011

Antiquing in the Satellite Pantry: Leftover Bruce's Yams Cookies

Bruce's Yams Cookies
A few days ago, I left my new, beloved home for a month-long trek in nostalgia, non-schedules, and other people's kitchens--I'm couch-surfing across the country to visit long-unseen friends and family.  So far, it's been nothing less than the best thing ever (besides my husband's sense of humor).

My first stop was to see E--my best friend from high school days--and her new husband, J.  Flying in, I was excited enough to pee a little, and seeing E for the first time in nearly 8 years confirmed that the excitement was justified:  I wanted to holler and jump up and down when I saw her smile--it's always elating to know that the kid in you is still there; after all, there's someone who remembers you as that kid and loves you for it, pimples, bad fashion choices, and all.  

The kitchen antique
So, I didn't holler or jump, but I definitely giggled and haven't stopped smiling since I got here. 

Arriving at E & J's house, I was greeted by a plethora of fresh foods and vegetarian/vegan staples--they had stocked their fridge and pantry just for me, and I felt like a princess (sans the Royal Wedding) arriving to live in a new palace.  Their only request was this:  I had to use, somehow, the beast that was a ginormous can of Bruce's Yams, a lonely survivor of Thanksgiving, 2010.  

My mission had been chosen for me, and I wasn't backing down.  Instead, I was making yam cookies.  

As usual, I went to work checking out recipes and the rest of the baking supplies in the house.  Some things were missing, so, during our shopping and eating escapades around town, we stopped at the local grocery store and picked up some missing parts.

The kitchen assistants
And, as usual, I got side-tracked, changed my recipe after looking at the supermarket shelves, and forgot one essential ingredient--baking soda.  Thus, we were destined to do what most people are destined to do in life--improvise.  It definitely helped to have some cocktails along the way.

Our experiment turned out to be a blissfully delicious, many-textured concoction of the old and the new.  Here's how we did it: 


To have/do:
Bruce's Yams Cookies:
  • 1-1/2 c flour--white or whole-wheat
  • 1 c brown sugar
  • 1-2 tsp pure maple syrup
  • 1/2 c canola oil
  • 2 tsp pure vanilla extract
  • 1 egg (or substitute 1/3 c applesauce for a vegan version)
  • 1 c Bruce's canned yams, aged gently in the can, mashed
  • 4 tsp baking powder (change it up if you actually remembered baking soda)
  • 2 tsp salt
  • 2 tsp ground ginger
  • 2 tsp cinnamon
  • 1 tsp all-spice
  • 1 c semi-sweet chocolate chips
  • 1 c chopped pecans

1.  Pre-heat the oven to 350 degrees F; prep your cookie sheet with parchment.

Bruce's Yams Cookie batter
2.  In a medium-sized bowl, whisk together the dry ingredients--flour, baking powder, salt, ginger, cinnamon, and all-spice. 

3.  In a large bowl, combine the sugar and canola oil.  Once combined, add in the rest of the wet ingredients--maple syrup, vanilla, and egg/applesauce.

4.  Fold the dry into the wet mixture, being careful not to over-stir (otherwise, you'll have too-gooey cookies).  Add in the chocolate chips and pecans, stirring until just-homogeneous.  

Test-version on the cookie sheet
5.  Using a spoon, plop 2-tsp rounds of the batter about 1-inch apart onto the cookie sheet--you should be able to fit between 12 and 15 cookies on a sheet safely.

6.  Bake for 15-20 minutes, being careful to check on the cookies every 3-5 minutes for the first batch (so that you won't overbake).  They should be just set on top; when you push down on them gently, they shouldn't give too much.  Let them cool on the sheet for a few minutes before devouring them.


Maple-Cinnamon Glaze (optional):
  • 1-1/2 c powdered sugar
  • 2 tsp cinammon
  • 1 tsp all-spice
  • 2 tbsp (or more) pure maple syrup
  • 2 tsp canola oil
  • 1-3 tsp water

Combine all ingredients--we used a tall measuring pitcher so that the sugar wouldn't sprinkle the kitchen with suspicious white powder.   The glaze should be runny enough to slowly drizzle off the spoon, but not so runny that it pours off the spoon.  If it's too thick, add more water/syrup; if it's too thin, add more powdered sugar.

Maple-Cinnamon Glaze texture

Thanks be to Bruce--his can-aged delicacy made our night of drinking while satellite kitchen-missioning yam-tastic to the max.
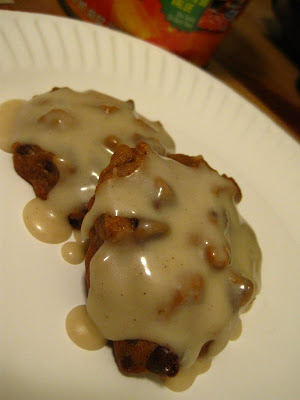
Bruce's Yams Cookies with Maple-Cinnamon Glaze

Monday, April 25, 2011

Giving Your Kitchen Some Old-School Roots: Planting a New Vegetable Garden

My new garden
Now that it's been sunny out for a few days, I've started to bug my husband about gutting the yard(s) and re-organizing what is left of our landscaping, after him living like a bachelor and not keeping up with anything but the sprinklers over the past 5 years.  It's a jungle out there, to say the least.  And although I know squat about gardening (get it?), I figured it was time to get out there, get my vitamin D, and learn to make things grow.
 
As B would say, planting one's own garden is very "hippie-dippy," especially for me.  Embracing this idea, my husband and I donned our semi-matching tie-dyed shirts (oh, yes, we did) and made absolute dorks of ourselves by going to our local gardening shop and adopting starter plants and a hot-pink tomato cage (!) to put in a brand new home in our newly-cleared backyard soil bed. 

I'm crossing my fingers that we won't get another snow so that my little plant kids survive through the summer.  If you're interested and have the space, here's how I made my tiny treasure trove of what (hopefully) will become my own grocery store.  I'm sure it's riddled with mistakes, but it's my first time, so go easy on me, or I'll sick my hoe on you.

To have:
  • approximately 4' x 8' of garden space, filled with soil
  • gardening gloves
  • a small soil rake
  • a small gardening hoe (Bonus:  You can ask for this by saying, "Honey, you know where mah hoe be at?")
  • a normal-sized yard shovel
  • 1 tomato cage
  • 12 plant stakes (we made our own from trimmed tree branches)
  • 1 young tomato plant*
  • 4 young cherry tomato plants*
  • 4 young cucumber plants*
  • 4 young yellow banana pepper plants*
  • 4 young cilantro plants*
  • chive seeds/young plants*
  • cayenne pepper seeds*
  • extra topsoil for fertilizing and building up your plant mounds
  • water
*Of course, if you're not into these plants, change it up, but I wouldn't advise doing anything leafy on your first try--it's harder to grow those without using pesticides.


To do:
The chives' plot area

1.  Arrange a 4'x 1' area on both the right and left sides of your plot.

2.  On the left side, plant your cayenne pepper seeds (1-3 seeds, 6" apart) about 5 mm below the top of the soil.  Cover with fresh topsoil.  Water until moist.  On the right side, do the same thing with the chive seeds/young plants.  Chives are (apparently) really hearty, so you don't have to be too careful with them.  They're the only plants that survived in our plot over the past 5 winters with absolutely no attention.

3.  Parallel to the chives, dig a vertical row deep enough to really root in your tomato cage and four stakes in a circular shape (to mimic the shape of the cage).  Replace the soil to make a flat surface.
 
The tomato plants
4.  Transfer your tomato plants, one at a time, and make little topsoil mounds around them, being sure to tighten up the soil around them.  I planted the regular tomato plant (caged in) first.  Then, I planted the four cherry tomato plants in a circular shape (each one with its own stake) about a foot below the larger tomato plant.  I'm pretty sure you're supposed to space things out a bit more, but, again, this is sort of an experimental thing, being that it's a learning process.

5.  To the left of the tomato plants, make 3 horizontal rows, digging deep enough to get those stakes in.  Line 4 stakes, equidistant from one another in two of the three horizontal rows.  Make a flat surface again over the stakes before transplanting the young saplings (I have no idea if that's what they're called--it just seemed right.).


The three horizontal rows
6.  In any order you wish, transfer your young cilantro plants into one horizontal row (the one without the stakes), your banana pepper plants into another horizontal row, and finally your cucumber plants into the last horizontal row.  Again, be sure to make the compact (but not too tight) topsoil mounds around each of the young plants so that they feel all nestled in and secure.

7.  Water everything, and then marvel in the glow of your soon-to-be spread of home-grown goodies!


My future produce aisle

Saturday, April 23, 2011

Almost From Scratch: World-Fusion Chips & Salsa

It's finally warm out today, and it's making me crave warm-weather snacks, namely margaritas and Mexican.  I've been reminiscing about the hours of graduate school spent drinking and laughing with J, L, and T on the patio of our favorite Mexican restaurant.  I haven't, however, been thinking fondly about how many calories were in the things we were eating and drinking nearly three times a week back then.  

So, as always, it was time, in my mind, to make a compromise--celebrate the memories, but cut the calories.  I didn't feel much like a trip to the grocery store, so I needed to use what we had available.  Since there weren't any fresh peppers left in the fridge, I decided to go with a mixture of Indian, Thai, and Mexican flavors to compensate.  And here's how I did it, ultra-fusion style:

To have/do:

Homemade Fusion Salsa:
Thai/Indian/Mexican Salsa
  • 6 medium-sized tomatoes
  • 1 large white onion
  • 1 bunch of scallions
  • 10 garlic cloves
  • 1/8 cup unsweetened, shredded coconut
  • 2 tsp dried dill
  • 2 tsp dried basil
  • 4 tsp dried cilantro leaves
  • 2 tsp ginger
  • 2 tsp celery salt
  • 2 tsp of each:  lemon juice, lime juice
  • 2-4 tsp sriracha (if you like it hot!)
  • 4 tsp hot curry powder
  • 2 tsp fenugreek
  • 4 tsp agave nectar (don't use honey!)
  • 2 tsp thai seasoning (optional)
  • 4 tsp red pepper flakes
  • 2 tsp sea salt 
Roughly chop all the veggies.  Pour all the ingredients into a food processor.  Blend until smooth (unless you're on the chunky side of that dichotomy). These ingredients make a whole lotta salsa, so if there're leftovers, just freeze 'em.

"Homemade" Baked Tortilla Chips:
  • 6-8 flour or corn tortillas, cut into chip-like shapes (I used store-bought whole wheat flour tortillas)
  • 2-4 tsp canola oil
  • 2-4 tsp lime juice
  • 2 tsp cumin
  • 2 tsp onion powder
  • 2 tsp sea salt
  • 2 tsp celery salt
Going into the oven
Pre-heat the oven to 350 degrees F.  Lightly grease a cookie sheet.
Wash your hands thoroughly.  Then, combine the oil and lime juice in a small bowl.  Dip your hands into the bowl to massage around 1/3 of the chips (enough to fit on the baking sheet) with the liquid mixture.  They don't have to be covered with it--just slightly moistened.

Arrange the chips on the baking sheet, fitting as many as possible without having them touch one another too much.

In another small bowl, combine the cumin, onion powder, sea salt, and celery salt.  Using clean, dry hands, sprinkle a bit of the mixture over each chip.

Bake for 6-7 minutes, turn, and bake for another 6-7 minutes.  Repeat a few times to finish off your tortillas.  Viva las chips & salsa.  

Homemade Fusion Chips & Salsa 
(garnished w/ sriracha)

Friday, April 22, 2011

Berry Cheesecake Crumble Bars

Last night's bonfire party was a hit, especially because the
majority of my mini-donuts were eaten and enjoyed.  The  mixed-berry flavor was more popular than the lemon, so I'm planning to make more of those for the Easter supper we're attending tomorrow (where there'll be the most kids who'll be the
most impressed by the miniature treats).
Berry Cheesecake Crumble goodness

Tonight's shindig is a house-party potluck featuring a concert put on by a travelling fiddler and his accompaniment--an accordionist!  Though it involves lots of modern-day hippies (not exactly my typical, everyday company, what with all the rap music), I think I'm still going to enjoy myself.  However, I thought that bringing mini-donuts wouldn't quite fit the tree-hugger bill, so I went on a search for a mixed berry recipe that I could healthily "hippie out" for tonight's crowd.  Though it won't be vegan, it won't involve any criminal whites (i.e., white flour, white sugar, corn syrup).  Hopefully, it'll make the musicians happy--I really want a chance to play that accordion once the show's over!

Without further adieu, here's the recipe, mission-modified from this version:

To have:
Crumb Mixture (top and bottom of bars):

  • 1 c whole wheat flour
  • 1 c packed brown sugar, with extra aside for topping
  • 1/2 c almond flour/ground almonds
  • 1 tsp lemon zest (or just 1 lemon's zest)
  • 1/4 c canola oil
  • 2 tbsp cold water
Filling (middle of bars):
  • 2 eggs
  • 1 egg white
  • 1/2 package light cream cheese, broken into small chunks
  • 1 c brown sugar
  • 3/4 c plain, unsweetened low-fat yogurt
  • 1 tbsp amaretto

To do:
Crumb mixture's consistency
1.  Pre-heat oven to 350 degrees F.  Line a 13x9 baking pan with aluminum foil.  Lightly grease the foil with canola oil.


2.  Mix all crumb mixture ingredients together in a large bowl, breaking up chunks of brown sugar with your fingers.  Mixture should mold together when squeezed, but should remain in a crumb like form when stirred a few times. 


3.  Pour half of the crumb mixture into the bottom of the pan, flattening and evening out the mixture to form the bottom of the bars.

Half of crumb mixture--bar bottom
  
4.  In a large, tall bowl, use an electric mixture to blend all filling ingredients (except the berries) together until fluffy.  Don't worry if the mixture seems too liquid-y; the moisture will bake out if you bake long enough!


5.  Pour the filling over the crumb mixture inside the pan.
 

6.  Sprinkle the berries relatively evenly over the filling.  Let sit for a few minutes so that berry juice starts to ooze into the
filling. 

With filling oozing together

7.  Using your hands, sprinkle the remaining crumb mixture over the berries and filling.  Top with a few additional sprinkles of brown sugar, just to add crispy texture to the top.  Let sit for a minute.


8.  Using a small knife, create swirls first vertically, then horizontally, then diagonally through the bar filling and topping.  This creates neat-o berry juice and creamy filling designs.


Crumbly, gooey, berrylicious.

9.  Bake for at least an hour, longer if necessary.  Use the typical toothpick test for doneness, and be sure that the top of the bars is a slightly-hardened crust.  Let cool completely before removing foil and cutting into bars.  Berry it up, one bar at a time.

Thursday, April 21, 2011

Rings of Happiness: Baked Mini-Donuts

Because I've been doing my best to save as much money as I can for travel, I've been frequenting second-hand stores in town, always in search of interesting kitchen stuff.  This month, one of my favorite stores had a punch card discount deal, and, like the senior citizens who smile at me in the aisles on discount days, I knew I was in for a treat--getting an extra discount on already-discounted goodies.
Mini-Donut Rings (4)
While perusing the kitchen realm of the store earlier today, I happened upon a teeny-tiny mini-donut pan--brand new--for $0.49.  Um, yes, I will take this adorable piece of bakeware for 30% off, please.  On the way home, I thought, "Hmm...donuts aren't really so healthy, but I do have three small parties to attend this weekend, and there will be children as well as adults who love their sweets, and no one's bringing a dozen donuts, so I'll be sure to bring something unique!  Plus, they're so small--if you're only eating one, you'll be fine!"  And away with my rationale I went.  This mission was not necessarily about making something healthier, after all, but about using this new pan, right?  

After researching recipes, I decided on a very straightforward, lemon-flavored one (found here), but I changed a few things and made two versions--lemon cream and mixed berry.  For this entry, I'll do ingredients and steps together for each recipe.  As a note, please be careful with the timing on these things--they're as delicate as southern belles act, and if you overcook them, they will definitely not be delightful.


Lemon-Cream Donut Batter:
Lemon-Cream Batter 1/2 filled
1-1/4 c cake flour, sifted
1-1/4 tsp baking powder
3/4 tsp salt
1/2 c sugar
1-2 tsp lemon zest
2 tsp lemon juice
1 egg, lightly beaten
3/4 c 35% cream
1-1/2 tbsp butter, melted


1. Preheat oven to 425 degrees F; lightly grease a mini-donut pan. 

2. Blend together the flour, baking powder, and salt.

3. Grind/food process the sugar, lemon juice and zest.  Add to flour mixture.

4. Add in egg, cream, and butter.  Stir until dough is uniform. 


Overbaked (at top)

Lemon-Creams cooling
5. Add into pastry bag or plastic zip bag (piping set not needed--just snip the tip!).  Pipe dough/batter into pan, filling the holes halfway.

6. Bake in oven for 5 min, 30 sec; take out to cool in pan for at least 3 min.  Cool on rack for at least 10 min. before glazing.

Lemon Glaze:
2 c powdered sugar
juice of 1 large lemon
1 tsp lemon zest
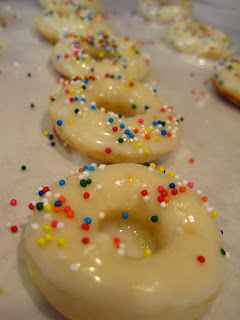
Lemon Glazed & Sprinkled
additional liquid (milk/water), if needed
rainbow sprinkles (for post-glaze)

1.  Juice the lemon, straining the seeds and pulp.  Pour the powdered sugar and zest over the juice and mix thoroughly.

2.  Let sit for at least 2 min.  If the mixture has a slightly-runny consistency, it's good to go.  If not, add a bit more lemon juice, water, or milk.  If it's too thin, add a bit more powdered sugar.

3.  Placing waxed paper under the cooling rack, dip the top face of each donut into the glaze, turning as it's removed, and set each one back in its place on the cooling rack.  Top with rainbow (or other) sprinkles if desired.

Mixed Berry Donut Batter: 
1-1/4 c cake flour, sifted
1-1/4 tsp baking powder
3/4 tsp salt
1/2 c sugar
1 egg, lightly beaten
1/4 c ground frozen mixed berries, brought to room T
1/4 c 35% cream
2 tbsp butter, melted

Mixed Berry Batter
1. Preheat oven to 425 degrees F.  Lightly grease a mini-donut pan.

2. Blend together the flour, baking powder, and salt.  Mix in the sugar.

3. Add in egg, ground berries, cream, and butter.  Stir until dough is uniform. 

Mixed Berries cooling
4. Add into pastry bag or plastic zip bag (piping set not needed--just snip the tip!).  Pipe dough/batter into pan, filling the holes halfway.

5. Bake in oven for 5 min, 45 sec; take out to cool in pan for at least 3 min.  Cool on rack for at least 10 min. before glazing.


Berry-Lemon Glaze:
leftover lemon glaze
1/8 c ground mixed berries
additional powdered sugar
clear sprinkles (for post-glaze)

1.  Using the leftover lemon glaze, stir in the mixed berries.

With Berry-Lemon Glaze
2.  Add at least another 1/4 c  powdered sugar so that you have enough glaze.  If the mixture is thick, add lemon juice or a little more of the berry mixture.  If the mixture is thin, again, add more powdered sugar.

3.  Placing waxed paper under the cooling rack, dip the top face of each donut into the glaze, turning as it's removed, and set each one back in its place on the cooling rack.  Top with clear (or other) sprinkles if desired.

Again, the goal, as a healthy, balanced person, is to eat only 1 of each.  Give them away if you have to--it'll make other people smile!

All packed and ready to party.

Wednesday, April 20, 2011

Furuutsu Nigirizushi (Fruit Sushi--Vegan)

Since the last few weeks have been filled with semester-end stress, I haven't been as busy in the kitchen as usual.  I've been eating simple foods like whole fruits and nuts, which, by any standard, are healthy and worthy of the celebration that is springtime after nearly 6 months of winter.  Nevertheless, I've been feeling a bit antsy, and I've convinced myself that it's due to the lack of not creating things and taking pictures of them.  Yes, this is the problem.
Furuutsu Nigirizushi Platter

Thus, I took it upon myself to make yesterday a day of creation, in any right.  The problem is, before creating things in the kitchen, I have to clean the entire house.  You know you suffer from the same or a similar malady--don't deny it.  Being that I love the kitchen more than I love hip-hop (which is a lot), I usually start there, but I wanted it to be my reward.  After moaning and groaning over laundry and bathroom details, I ended in my tiled solace, the last step being the preening of the fridge.  Throwing out a cup of buttermilk, some sad, forgotten tarragon, and hardened cream cheese, I came across way too much leftover rice with 48 hours to go, a few pineapple logs that had a day left, and half a grapefruit.

Racking my brain for what to do with the survivors, I remembered the place where I fell in love with rice for the second time in my life--Tokyo.  I've been thinking about Japan so often lately, especially considering all that's happening now.  Just yesterday, I talked to M-chan, who is staying strong there through it all.  I remembered our nights walking home from the office, wondering what to pick up for dinner on the way, me always wanting sidewalk sushi, M-chan more often opting for French or Italian with a nice and beautifully-constructed dessert.  Then, it dawned on me--why not make sushi the dessert?!  M-chan would adore it, so long as I made it into something incredibly cute (with a little bit of pink involved).  I imaged-searched "fruit sushi" for inspiration, got ideas from here and here, and went to work.  This one is for you, Japan, with a little extra for my home-slice M-chan in Tokyo.

To have:
For nigirizushi rice pudding:
6 cups cooked rice
1 can coconut milk
1-1/2 cups brown sugar
1 tsp cinnamon (+ extra for sprinkling)
1 tsp ginger
1/2 tsp lemon juice
3-5 tbsp maple syrup
2-4 tbsp corn starch (or other thickener)

For nigirizushi "meats" and garnishes*:
1/4 cucumber, unpeeled
1/2 grapefruit
1/2 a log of pineapple (about 1/16 a pineapple)
3-4 large, fresh strawberries
1/4 tsp sesame seeds (white or black)
*You will have more rice than "meats," so bring more fruit home!

To do:
Place your rice into a saucepan, breaking up any clumps.  Add in the coconut milk and stir.  Once the mixture combines, turn up the heat to medium-low.  Stir and let warm for a few minutes, but try not to let the mixture boil if you can help it--if so, you might get some crispy rice.

Rice mixture at desired consistency
Lowering the heat a bit, add in the brown sugar, cinnamon, and ginger.  Stir well, being sure to get all the clumps of sugar broken up.

Add in maple syrup, 1 tbsp at a time, being sure not to add too much--you want a smooth, but sticky texture in the rice.  I used 4 tbsp, but it all depends on the type of rice you're using and how long it's been sitting in the fridge; mine was a tad dried out.

Once mixture is fully combined, let sit on low heat for a few minutes, stirring often.  Add in lemon juice and stir well.

Finally, add in cornstarch, 1 tbsp at a time, stirring and waiting for 30 seconds before adding in an additional tbsp. I used 3 tbsp in my mixture, but again, it depends on how much water you have to work with in the rice.  You should achieve a gooey mixture that can be shaped (messily) into nigirizushi rice "fingers" by hand.

Take the rice mixture off the heat and set it aside to cool.  Be sure to stir once, just to keep excess rice from sticking to the bottom too much.  Yeah, that's me, saving you some clean-up time.

To further utilize time efficiently, head to your fruits & cucumber.  Using a cutting board and a small knife with a serrated edge (for safety's sake while working with these slippery fruits), make your fruit cuts and garnishes.

Cutting the grapefruit
Start with grapefruit--use the knife to cut out those 3-D triangles, and then slice the triangles in half width-wise.  Depending on the size of your grapefruit, the pieces will be around 1-1/2" x 3/4". These are the grapefruit "meats."  With a few leftover triangles, cut small rectangles for a garnish on the pineapple "meat."

Cutting the pineapple
Onto the pineapple--cut the thin, tough core-like strip from the pineapple log and discard/compost.  With the widest part of the log facing up, slice into the log, cutting out pieces around 2" x 3/4".  With a leftover piece, cut small rectangles that will garnish the grapefruit "meats."

Slicing the cucumber peel


For the cucumber, if you're working with a whole cucumber, rinse it thoroughly, and then chop off one of the butt-ends--around 1-1/2".  Starting close the peeling, slice a large chunk of cucumber peel away from the cucumber butt.  I love that I get to type "butt" in a formal way.  Use this peel to trim up a few small rectangles (to garnish the grapefruit "meats") and also a few long, thin triangles for the strawberry pots.

Making a strawberry pot
Finally, the strawberries--these will be like planters for the rice mixture.  Wash them well, and then chop off the tips.  For each strawberry, rest on the cutting board tip-side down and cut a funnel-shaped hole into the core, removing and discarding/composting strawberry innards.

Making sure that the rice mixture has cooled, assemble!  Shape your nigirizushi rice into small, fat cylinders using your palms; shape further by gently squeezing the cylinders between your index finger and thumb, turning and repeating the step a few times.  Once you've achieved a good shape, it should look like a fat finger--place it on your serving plate.  Make as many rice fingers as you need before dressing them.

Rice fingers--beds for the fruit "meats"
To assemble Pineappuru-furuutsu (my katakana-ized name for it--similar to a young Japanese person's pronunciation of borrowed Western words), place a pineapple "meat" onto a rice finger.  Garnish with grapefruit, and sprinkle with cinnamon.

To assemble Guraypu-furuutsu,  place a grapefruit triangle onto a rice finger.  Garnish with pineapple and then a cucumber rectangle.

To assemble Suturawberri-furuutsu, fill a cored strawberry with about 1 tsp of rice mixture.  Garnish with a cucumber triangle.  Sprinkle a few sesame seeds over each pot.
  
Itadakimasu!
(Let's eat!)

Suturawberri-furuutsu, Guraypu-furuutsu, & Pineappuru-furuutsu


Wednesday, April 06, 2011

Slimmed-Down Granola (Vegan)

Slimmed-Down Granola with yogurt
Last week, one of my roller-derby cohorts (thanks, A!) passed along a granola bar recipe to me; I'd eaten one of hers at our last practice, and I'd, of course, enjoyed it to the maximum.  I mean, c'mon, it's granola.  In any case, at this week's practice, she handed me a fresh recipe card with a fresh new recipe to try.

Excited to make the "healthy" treat, I scanned the recipe, only to notice two evil-hearted, yet extremely tasty cardiovascular disease culprits:  butter and sweetened condensed milk.  These were, of course, the reasons I'd enjoyed her granola bar so much in the first place.  I mean, who doesn't want a bowl full of butter and sweetened condensed milk with a little dried fruit and oatmeal?  If I were 18 again, I'd have at it.  But since I'm not, I had a new challenge--to make a tasty, chewy granola bar without the heart-health hazards.

Looking around the kitchen, I racked my brain for what to use as a binding agent.  I was out of eggs, and I didn't want to use too much honey, as its glycemic index is nearly as high as that of white "straight to your food belly" sugar's.  I spotted some over-ripe bananas and my agave nectar & decided to make the best of it.

Now, while I know that there's sugar in dried fruits and carob chips that I've added, and that there are plenty of carbs in oats, I truly believe that this recipe is one of the healthiest you'll find for a still-tasty granola fix.  Free of oil (aside from the natural oil in the nuts) and added sugar, here's what I came up with, modified from A's recipe:

To have: 
dry components:
3 cups quick oats
1/3 cup flax seeds
1 cup chopped dried mango (requires muscle mass)
1-1/2 cups dried cranberries
1-1/2 cups pumpkin seeds (unsalted)
1 cup Brazil nuts, chopped finely or ground
1-1/2 cups carob chips

wet components:
2 small overripe bananas, mashed well
3-4 tbsp agave nectar/syrup (plus extra for drizzling)
1 tsp cinnamon
1/2 tsp lemon juice

To do:
Set the oven to 400 degrees F.
 
In a super-large bowl, mix together the dry ingredients, adding more or less of each type, depending on how many additions you have.

Mixing the wet into the dry
In a separate bowl, whisk together the bananas, 3 tbsp agave nectar, and 1 tsp cinnamon until the mixture is fairly uniform.  Add in the lemon juice (to prevent the bananas from blackening further) and mix in well.

Add the wet mixture to the dry ingredients, stirring to be sure that all the dry ingredients are coated.  If necessary, add more agave to be sure that all the oats have some moisture.
Making the "sheet" of granola

Using at least a 9 x 13 inch baking sheet/pan lined with parchment paper, spoon the granola mixture out of the bowl onto the pan.  With each spoonful, try to flatten the mixture, making a "sheet cake" of granola in the pan.  This part is messy, yes.


After you have achieved your sheet cake of granola, use a spoon or a spouted bottle to drizzle agave nectar/syrup diagonally back and forth across the sheet.


Bake for at least 20 minutes, longer if you'd like the granola to be crunchier.  Remember, kitcheneers:  the longer you bake it, the drier you make it.

Sheet of granola, 
ready to bake
Wait until granola has completely cooled to cut into bars, or break it up into pieces to crumble onto yogurt.

Try to eat only one.  The rationale here is that, though it's health food, it's only healthy if you don't eat 10 at a time, as I usually do.  Yeah, good luck with that.


Slimmed-Down Granola Bars

Saturday, April 02, 2011

Not-So-Boring Beans & Rice (with Chickpea Salsa)

Recently, I've been volunteering to tutor students in the library on Saturday mornings, but, for the past 2 weeks, my students have been standing me up.  It's pretty daunting to stare at the wall while waiting for 2 hours just in case they show, so today I decided to take a trek around the new cooking magazines to bide my time.

Of course, I came upon my favorite cooking mag as of late--Cooks, Illustrated.  Always a gem in my book because of the logical explanations and hands-down best recipes ever, I took my time leafing through their newest test-kitchen recipes, trying to find one that I could modify to be heart-healthy and utilitarian (I didn't feel much like shopping today.). 
Party People's Beans & Rice 
w/ Chickpea Salsa
After looking through, salivating over, but passing up recipes for Potato Galette and Boston Cream Pie, I came upon a recipe for Cuban Black Beans & Rice.

While I didn't have black beans or pork in my kitchen (both of which the recipe called for), I did have a 9-bean soup mix that I had just happened to put to soak in the a.m., and I did have a whole roasted chicken waiting to be devoured.  So, voila!  Off I went to make a Dutch oven full of not-so-boring rice and beans.


To have:
3-4 tsp canola oil
1 cup beans, pre-soaked for 8 hours
2-3 bell peppers, halved and seeded
1 large onion, halved and peeled
1 whole garlic head, 6-8 cloves removed
3 bay leaves (or 1-2 tsp ground bay)
1-1/2 cups long-grain rice
2-1/2 c chicken broth
2 c water
1-2 c diced chicken (pre-cooked)
2-3 tsp salt
2 tsp Creole seasoning (I make my own; here's the recipe I use)
2 tsp ginger
2 tsp celery salt
2 tsp cayenne pepper
2 tsp cumin
2 tsp dried cilantro leaves (change it up if you wanna)
2 tbsp white or red wine vinegar
lime wedges, for serving garnish
fresh cilantro and/or chives, for serving garnish
----------------------------------------------------------------------------
For optional chickpea "salsa":
1 can garbanzo beans/chickpeas
leftover veggies (sans bay leaves) from first step in cooking process
2 tbsp tahini
2 tsp sriracha
2 tsp honey
2 tsp dried rosemary
2 tsp dried thyme
1 tsp celery salt


To do, Beans & Rice:
First round of cooking
Drain and rinse the beans.  On medium in a Dutch oven, heat the beans, 2 c chicken broth, water, bay leaves, one onion half, one bell pepper half, the garlic head (unpeeled), Creole seasoning, and 1 tsp of salt.  Bring to a simmer.  Lower the heat and cook for around 40 min.

If using cooked chicken, add in the chicken and the rest of the chicken broth. Being careful to use pot holders when handling the Dutch oven, remove the bulk veggies and bay leaves (keep these for a veggie broth for later in the week!), and drain the beans, reserving the liquid.  You should have around 2-1/2 cups.  If not, add broth/water to make the quota.  Set the beans on the side.  Don't rinse out the Dutch oven, but set it on a cooled burner, unless you are using raw chicken.  In this case, return to the burner you've been using, add in 1 tsp of oil, and cook your chicken for around 10 min.

Things on the side 
throughout the process
Set the oven to 350 degrees F, being sure that the rack is in the middle.

Using the remaining bell peppers and onion, food process by pulsing to get 1/4 inch pieces.  Adding another tsp of oil, sauté these with the cayenne, celery salt, cumin, ginger, and cilantro.  Stirring occasionally, cook for 12 min.  Watch carefully during this step, as the water from the vegetables has a tendency to threaten burning on the bottom of the Dutch oven if there isn't enough oil.

Right before baking
Rinse the rice with cold water, until the water runs clear.  Reserve the rice on the side.  Yes, there are a lot of things on the side at this point.

Mince/garlic press the leftover cloves of garlic.  Add to the vegetable mixture, cooking for around 1 min, stirring frequently. Add in the rice, coating it by stirring for around 30 seconds.

Out of the oven, resting

Pour in the 2-1/2 cups of reserved liquid as well as the beans.  Stir a few times,  and add in 2 tbsp of white wine vinegar.  Stir once more, and then cover and bake for 30-35 min.

When finished baking, set on the stovetop, uncover, and let rest for 5 min.  When done resting, stir a few times, add in juice from a few lime wedges, and top with fresh chives/chopped scallions if desired.

For each serving, top with 1-2 tbsp chickpea salsa (recipe below).


Finished Beans & Rice, 
topped with dried scallions


To do, Chickpea Salsa:
Food process leftover veggies until a puree-like texture is achieved.  Put into a small saucepan on medium heat, being careful to stir frequently.

Chickpea Salsa
Drain and can of garbanzo beans, and add into the puree.  Stir and let simmer for around 5 min.

Add in tahini, sriracha, and honey.  Stir well and let cook for another 2-3 min.

Finally, add in the rest of the herbs/spices.  Stir, and let cook for 1 more min.

Remove from heat.